Wednesday, November 22, 2006

Crochet Baby Booties

So with my new found crocheting skills and the prospect of making cute little tiny things, I tackled making baby booties. This was actually the second pattern I tried. The first pattern ended up looking more like an elf slipper, which if our little baby girls inherits Floyd's finger toes it might have been fine. But I'm thinking she'll inherit my tiny cinderella feet so she'll need little tiny booties. I tried these out on the 6 month old baby who comes and visits at work and they did fit her.

Here is the crochet baby booty pattern I used and some hints if anyone else wants to try and make these.

I used a size G hook with Micro Spun Lion Brand Yarn, which is really soft and cuddly. Instead of using 3 colors I only used 2. So I used the same blue/periwinkle yarn for the main color (MC) and Color A (CA) and then the purple for Color B (CB).

The first thing I learned is that it is key to pay attention whether it says to crochet in the space or in the stitch. When it refers to the "Ch2 space" it means the big empty holes in pictures 1 and 2. At first I crocheted in the stiches and then I ended up with an octogon instead of a square after completing the "Granny Square Instep" section.

The second tip I have is that you should make sure your stitches stay tight. After my first try my stitches were pretty loose and the whole thing was too big.

The following is a progression of the steps. I kind of had a hard time figuring out which way to go after each section, so hopefully this helps someone else.

After 1st part of Granny Step Instep:


The completed Granny Square Instep:


After 1st part of ankle ribbing:


After 2nd part of ankle ribbing:


After ankle ribbing:


Completed booties:

Thursday, November 16, 2006

Sew a Baby Quilt

baby quilt


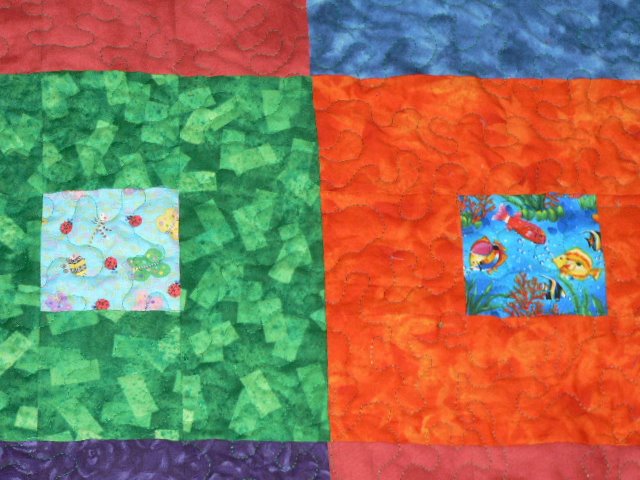
I finally finished the baby quilt I started about 2 years ago. I had started working on it but came across some problems and had messed up in a couple of places so I felt like I couldn't give it to anyone. But when I became pregnant I could finish it and keep it for myself. (Sometimes I feel like I am always passing my bad artwork/crafts to people as gifts, so I feel like I should spare them.) In the end it didn't turn out too bad.
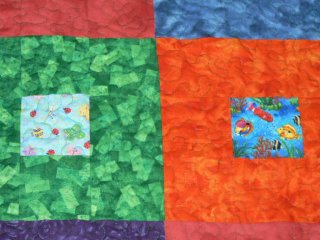

How I made it

Basically each square of the quilt is made from
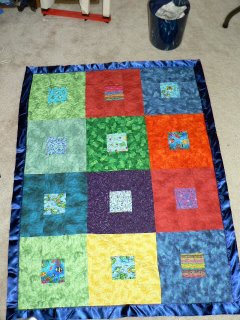
2 4.5 inch squares of main color
1 4.5 inch square of pattern
2 4.5 inch x 12.5 inch rectangles of main color

When you sew all the pieces together with a .25 inch seam allowance, you end up with a 12.5 inch square. When you sew all of the squares together with a .25 inch seam allowance you end up with 12 inch squares.

I sandwiched the quilt together using a Flynn Quilt Frame and tried to use that for machine sewing as well. I'm not exactly sure what went wrong, but my thread was constantly breaking while trying to quilt this quilt. My theory is that I was using an old spool of thread that wasn't of the best quality. When I replaced the thread it was a little bit better. I also think that the batting I used wasn't of the best quality. I haven't read anywhere that batting can cause thread to break, but it seemed to me like my sewing machine would hit a thick spot and break.

So eventually I got rid of the quilt frame because it was really hard to negotiate it smoothly, plus the thread kept breaking and I would have to take the whole thing apart, unjam the machine, etc, etc. But of course after getting rid of the quilt frame the basting I did to keep the quilt smooth was not very good, and I started getting ripples and folds in the quilt. To make matters worse I quilted about 12 inches on the top the blanket and then the thread kept breaking so I decided to start again from the bottom and maybe things would go more smoothly (which they did). So by the time I get to the middle I have all this extra fabric, due to my bad basting job. Oops. I ended up smoothing all the extra fabric in the middle and folding it straight across. So it kind of looks like there is a seam. Next time I make a quilt I'm going to try to get a batting that is fusible. I didn't even know there was such a thing before, but I think that might be good. Because on all the quilts I make, no matter how careful I try to be I cannot seem to keep the fabric on the bottom from folding and bunching.

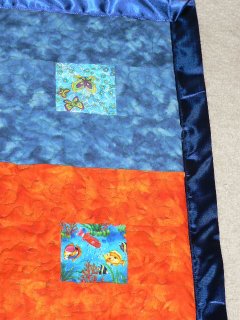
When I finally finished quilting, 2 years later, I put Wright's Satin Blanket Binding around it. The instructions on the blanket binding are not very good, and I will make another post on how to fold baby binding because it is kind of tricky to go around a corner and all the instructions just say "fold it around the corner". Anyways my binding ended up being 6 inches too short so I have a spot I patched up at the top. If your binding is too short I think your supposed to sew it together diagnoally to create a longer strip. I didn't do this and so the patch job I did doesn't look very good.

I wasn't sure if the binding was supposed to wrap the extra fabric and batting or not. I ended up serging all the way around to trim the extra fabric and batting (also so I could use my new serger). Then I sewed the binding onto the quilt with only about a quarter of an inch of the blanket sandwiched between the binding. So there is no padding between the layers of satin. I don't know if this was right or not, but that is how I did it. When I managed to coax my sewing machine all the way around the blanket I was finished! Yeah!


baby quilt

baby quilt


Posted by Picasa

Tuesday, November 14, 2006

20 Weeks Pregnant

So 20 weeks is supposedly the half way point, but I think its kind of cheating since 2 of those weeks are pre-conception and 2 of those weeks you don't even know your pregnant. But it is a milestone nevertheless. I am getting bigger. My belly button is threatening to pop out and it no longer jiggles like a bowl full of jelly when I laugh. The baby is kicking a lot and often.

Running is getting harder in that I am getting slower. I don't think I have any sprinting ability left. I no longer have the ridiculously torturous urge to pee (for the time being) while running or 5 times during the night, so that is good.
All in all things are going well.

Sunday, November 12, 2006

Crochet Baby Hat


Things I'm making for the baby

So on my quest to make lots of baby things I crocheted a baby hat. Unfortunately it seems like it might be a little big. I try so hard to do everything according to the directions, but it is really hard to count especially when you are trying to watch TV at the same time. I did start over once after I was about half way done because it was getting really large. Oh well. The pattern I used was at http://www.crochetnmore.com/babybeanie.htm.

I am not an experienced crochetier (sp?) So when the directions said, Ch4. 11 dc in 4th ch I wasn't sure what that meant. What it really means is chain 4 stiches and then do 11 double crochets in the first stich of the chain, so this becomes the top of the hat and is a little circle on top.

The next problem I had was on the rows 4-12. The following instructions: (Dc bet next 2 sts) . Were kind of confusing and I think this is where my hat grew in size. Your chain three is on top of one stich, so when it says to double crochet between the next 2 stiches it was hard to decide which one is the next stitch. I finally decided it wasn't the stitch directly below you, (ie the space just left to your 3 chained crochets), but the next one. If I make another attempt at the hat I'll try to post a picture. But even though I was trying to be so careful, my hat still grew so that I ended up doing 37 or 38 double crochets instead of the 36 specified. Darn!!

Also I never figured out how to do the reverse single crochet. It probably didn't help that I also tried to change yarn colors at the same time. But by this time my eyes hurt and I just wanted to finish it. So I just single crocheted between the stiches around the hat in the same direction I had been going.

Well if anyone trys to make this baby hat I hope my hints help some, and maybe someday someone can explain the reverse single crochet to me. Are you supposed to keep the needle in the same hand as you always use?

Lost Blog

I lost my blog for a day, but I guess it was because I created my blog in the beta version of blogger and I was trying to log in to the non-beta version. But I found it now. Yeah! But now it won't let me post! Oh wait it is just that everytime I hit publish it was posting it but telling me it couldn't. So I had this same post listed 5 times. Urgh I hate computers, I need to find a new profession.

Friday, November 10, 2006

Crochet Wool Diaper Covers


What I am making for the baby

So I am really excited for the baby to come and I think to fulfill my nesting instinct I feel the need to make stuff (this website included). So one of the things I have done is to crochet a Tickle Turdle Wool Diaper Cover. Now I have no idea if these covers are any good, but they only take a few hours to make so it is a good project for me since I don't have a lot of patience.


So I found this website that has videos of crochet stitches. Since basically all I knew how to do was a single crochet, this way I was able to figure out how to do the front post and back post stiches. I had tried looking at some diagrams but those were hopeless. I love the internet. You can learn how to do anything!


Since I don't have a real baby to try it on I had to put it on a stuffed animal (see picture). So I have made two so far. A size small and an x-small. The x-small may end up being too small, but oh well its really cute. Next I'm going to try crocheting a hat. I still have my quilt I'm working on. But my sewing machine keeps jamming so its kind of frustrating me.

My Serger

Stuff I'm making for the baby

So I found a serger for sale on Craigslist for $75 and decided to get it. I had been trying to make some baby diaper wipes and burp rags but a regular sewing machine just doesn't cut it. (Hee hee, I didn't mean to do that) It supposedly came with the manual but it wasn't really the manual it was a workbook.


The Serger I got is a Kenmore Overlock 3/4D Model 385.1664190 aka 16641. So I searched the internet to see if I could find the manual. Finally I found that at Sears.com if you go to customer service and parts and put in the complete model number (385.1664190) then you can get any part that goes to the serger or sewing machine and it has all sorts of schematics and pictures and stuff. Unfortunately the manual was labeled as Instruction Book so I had to go through about 15 links before I found the manual. But it was only $8 plus $7 shipping. (The shiping always gets you.)


Anyways the serger is great and my diaper wipes and burp rags look so professional! The best part is that I don't have to measure and cut the fabric perfectly. I can just use my scissors and cut out the area I want and then trace the shape I want using a sewing pencil and then just run my serger along the lines and it cuts it all for me! Also it doesn't jam like my sewing machine does. You think it would with all those threads, but once you get the tension set correctly things just go smoothly. I went to the library and got the book, "The Complete Serger Handbook" by Chris James. This taught me some serging techniques, plus it helped me figure out how to thread the machine before the manual arrived.

Well I guess I'll try this

I've been thinking of doing a blog for a while, but it just seems like one more thing to think about. Plus I spend enough time on the computer as it is, but now thatwe're having a baby I think family and friends may be interested in seeing what's going on these days. I am always figuring out how to do random stuff by searching the internet so I feel like I should "give back". I know, really cliche, but anyways I have a lot of stuff I want to put up here, but I think its going to take a while to get to it all.