Showing posts with label crafts. Show all posts

Saturday, July 19, 2014

I Want to Learn How to Draw

Art class was something I missed out in school.  I did band from 6th grade til my sophmore year of high school, and band took the place of any required art credits.  I did take one drawing class in college, but other than that I missed out on formal drawing lessons throughout my schooling--which is a bummer.

Lately I've been trying to improve my skills in hopes that I can illustrate my own apps more skillfully.  I've picked up some art books at the library, but one that has intrigued me the most has been Carla Sonheim's work.  She has a few book (affiliate links to the right) filled with art lessons and she has online classes as well.  At the beginning of this summer I signed up for her imaginary creatures class.  Her style is intriguing and interesting and learning her techniques have been fun.

Here are some various things I have drawn, some from both the lessons in her books, some from her class, and some on my own.  I really want to do her year long fairy tale class, but the $200 tag plus supplies is a bit much for me right now.  I'll just keep hoping a large fortune comes my way before the end of the year. :)


Friday, October 16, 2009

Simplicity 3856 - Sewing Toddler Pants

I used some of the Marcus Brother's fabric to make Selena some pants. They are super cute. Unfortunately I wasn't paying attention to the measurements on the pattern and neglected to make the pattern longer so they were way too short. So then I added a ruffle. They are still a bit short, but I'm going to make her wear them for a bit and then I'll retire them and save them for Allie. :)
Here is my complete review of the pattern.


Thursday, March 12, 2009

How to Sew Your Own Maternity Shirt by Altering a Non-Maternity Pattern

Background

I am newly entering the realm of sewing clothes for myself and just as I started attempting this new hobby I got pregnant. At first I wasn't going to sew anything maternity, but I had one shirt I really liked and when I tried to find similar style shirts at the stores I couldn't. So then I decided that maybe it wouldn't be so hard to alter a pattern that I had already made and that had turned out well to make the style I liked. Also I figured that since I could only wear the shirt for a few months, if it didn't turn out that great I wouldn't be stuck with it for that long. Well I ended up doing the same alteration to three different patterns and have been pretty happy with the result. The one challenge in sewing maternity clothes is that you are constantly changing sizes and you don't know where it is going to happen. You know your belly is going to grow, but is your chest, your hips, your butt? In my case I have pretty much only changed size in my belly and chest, but my bust size increased 2 inches 2 weeks after I made the first top. Unfortunately I kind of had a sizing problem around my bust anyways and then when I grew it just became more pronounced. But since I can only wear the shirt for a couple months, oh well.

The Style

Most maternity tops feature an empire waist with a lot of fabric in front and a tie in the back. Personally I am not a fan of this style. You feel like your wearing a tent and all the material hangs straight down over your belly and if the top starts getting too short you start feeling a breeze on your underbelly and the tie in back makes me feel kind of school girlish. The other option is usually just a knit shirt that is a little bit wider on bottom and longer. For me that style of top is okay, but if you are just starting to show then that style just kind of just makes you look misshapen or fat. The style I like has a wider and longer front panel that is gathered at the sides, so that from the back you still look like you have a waist. From the front your belly is accentuated so that it is obvious you are pregnant, and the shirt comes in a bit underneath the belly so you don't get the tent look as much. The good thing about sewing your own shirt is that you can make it long enough. I am 7 months pregnant at the moment and over half my shirts are already too short.

Choosing a pattern
The best patterns are ones that are pretty fitted around the waist and are designed for four way stretch knits. Four way stretch knits give you the most leeway in the sizing so that if your bust increases you have a greater chance of the top still fitting. So far I have done this alteration on Jalie 2682, Burda World of Fashion 11-2008 Style 103,2682 and Burda World of Fashion 2-2009 Style 103.


Altering the Pattern

- First you will have to choose a size. Which is kind of hard to decide. Basically your choices are to go with your pre-pregnancy size and possibly/probably do a full bust alteration, or do you go with your pregnancy bust measurement. The first shirt I made I went with my pre-pregnancy size and as I mentioned before my bust grew and then it didn't fit very well. The second top I made I still went with my pre-pregnancy size but added extra length to the piece that went over the bust to make sure the below-the-bust seam didn't ride up. That worked well, but because I didn't do a muslin it has some other fit problems. The third shirt I did I cut the pattern based on my bust size, but then did a muslin and radically altered the pattern around the armscye and neckline so much I'm not exactly sure what size it ended up being.

- If the shirt isn't that long you will want to lengthen the back pattern piece so that the hem will be around your hip. This will help ensure that the shirt won't become too short the last month or so.

- Here is the real alteration. Basically all you need to do is grade the pattern wider starting just under the bust and getting to the widest point at the waist. You will add approximately 1 1/2" - 2" of width at the side seam. The curve will be pretty sharp because there are only about 3-5" from below the bust to the waist.

- Then you will want to add enough length so that the front piece is 4" longer than the back piece. So if you added 2" to the back piece, you will need to add 6" to the front piece. If you didn't add any length to the back piece then you will just need to add 4" to the front piece. This is so you can have 4 half inch gathers on the side.

Sewing

- Sew the shirt following the normal instructions or however you wish to sew it. When you go to sew the side seams you will need to place the gathers. I mark the fabric 3" from the below the bust mark and fold the fabric up at that point 1/2" then fold the fabric back down and pin it. Then I mark 2" below the top of the first gather and fold the fabric up 1/2" and then back down. I do this for four1 gathers. I do both sides and then baste the gather's with my sewing machine, before I serge the side seams. This should leave you with 1 1/2" between the tops of the gathers.

Examples


If you use this technique please leave a comment and hopefully a link to a picture. :)  Thanks!

Sunday, January 25, 2009

Sew your own baby bibs

These are my two favorite kinds of bibs to sew and I have never seen them in stores so they make great baby shower gifts.

The first are made of fleece and simply serged around the edges (which isn't even needed because fleece doesn't ravel) and then sew some velcro for fastener. I just traced a bib I had bought for the shape. The fleece bibs work great for drooly babies because they last longer than a cotton bib and keep the baby's clothes drier.


The second is a sleeved bib, which is really nice for when your little one is feeding themselves and they are really messy. This will keep their sleeves clean as well as their front. Here is a link to the free long sleeved bib pattern.


These aren't homemade, but I think they are the greatest bibs. They catch all the food your child drops, and you just rinse them off in the sink. I was washing tons of cloth bibs, plus Selena's clothes because they didn't really keep her very clean. The Bibbity bib is excellent for going out because you can roll it up and it doesn't take up much space. The Baby Bjorn one is a little more structured so it catches food a bit better and is easier to wash, but doesn't fold up. I use the Baby Bjorn bib at home and the Bibbity one stays in the diaper bag or purse.


Friday, December 19, 2008

Sew your own cloth diapers

Here are some various cloth diapers I have made over the last year. I have finally perfected my patterns to fit Selena just right.

This was the best free tutorial I found on how to make a cloth diaper cover. I use fold over elastic and aplix. I really recommend using aplix or touchtape since anything else does not last very long at all.

Her method for drafting a fitted diaper is ok too, but I tweaked mine so the shape isn't very similar. Mine is more similar to the shape of a GAD pocket diaper. When I make pocket fitted diapers using the pattern I use fold over elastic on the pocket opening so I don't have to account for the pocket in the pattern.


Saturday, December 6, 2008

Sew your own baby carrier

Sewing different baby carrier's are fun and are really great baby shower presents. The benefits of these kind of carriers versus carriers you can buy in the store is that most are made so that the baby is facing the parent which in general is more cozy and less stimulating for the infant so they will like being carried for longer periods of time. Also most commercial carriers are designed so that all the baby's weight is being supported by their hips, and this isn't the best position for a baby to be in for long periods of time. Most of the carriers on this page have been used for centuries in various cultures.

I've made some slings, mei tai's, wraps, and soft structured carriers. My favorite carrier for nursing is a sling. For carrying an infant I liked a wrap. For a larger infant a mei tai (Asian Style baby carrier) in a front carry, and for a toddler a soft structured carrier in a back carry. Here are a few carriers I have made. I've made more but unfortunately I didn't always get picturees before I gave them away.

The best sites I have found to get help and free patterns for sewing is Jan Andrea's website. And thebabywearer.com's Do It Yourself Forum.

Specific free patterns that I have tried and liked:
Wrap - I used knit t-shirt fabric and just cut it and didn't sew anything.
Mei Tai (ABC) - I made one with this pattern and one with my own pattern and this was easier.
Sling - I've used a lightweight denim and knit t-shirt fabric and liked the knit one better but it doesn't work as well for older babies.
Soft Structured Carrier - The one I made in the pictures was my own pattern. I am in the process of making this one, but so far it looks better than my own pattern.

Wrap or SPOC (Simple Piece of Cloth)

Soft Structured Carrier


Mei Tai or ABC (Asian Baby Carrier)

Wednesday, December 3, 2008

Sew your own soft sole baby shoes

So these are so cute, really quick to make, are a great way to use scrap fabric, and are really useful. They help keep a baby's socks on their slippery feet and are good for feet as they are learning how to walk.

My favorite free pattern is from StardustShoes but it doesn't enlarge very well, so for bigger feet Tacky Living's pattern is good.

I used jiffy grip slipper fabric on the bottom of some, and scraps of PUL (waterproof diaper cover material) with the plastic side out on others.


Sewing Baby Items

So this is way overdue. I really wanted to post pictures of all the different crafts I've done over the past 20 months, but I just haven't gotten around to it. So I'm going to start trying to play catch up now. :)

Here is a link to all my crafts. :) Enjoy

http://bangerlm.blogspot.com/search/label/crafts

Sunday, January 27, 2008

Free Crochet Longies Pattern

Pattern for Crochet Longies

Wool pants for use over cloth diapers
This is a pseudo-pattern for a pair of crochet longies. I have made these in roughly a size 12 months for my daughter. They are very thick and have a lot of stretch to them. They would probably be very good to go over a cloth diaper at night. I don't have a lot of experience crocheting and I just made the pattern up as I went along so it isn't perfect. You can do whatever you want with the pattern, but if you want to give me some credit I would appreciate a link to this page. If you have any suggestions, comments, questions, corrections, or if you make a pair and want to show me the pictures please leave some comments on my blog. Good luck.

I used 2 ½ skiens of cascade 220 wool yarn. This was about 550yards or 250 grams. This is a worsted weight yarn. (For thinner pants a thinner yarn might be good). I also used a size G hook.

I'll tell you what I did and try to give you the stitch count in parenthesis for the size 12 month longies I made. I hope the counts are accurate…

STITCHES:
Chain:
Double Crochet
Front Post Double Crochet
Triple Crochet
Front Post Triple Crochet
Videos explaining crochet stitches


FRONT OF 1st PANT LEG:
Row 1: Chain the length you want your pants (60) chain 2 turn
Row 2: double crochet till 6 from the end (54) and triple crochet the last 6 ch 3 turn
Row 3: front post triple crochet next 5, front post double crochet till 6 from the end (49), front post half double crochet last 6, ch 2 turn
Row 4: front post double crochet next 5, front post double crochet till 6 from the end (49), front post triple crochet last 6, chain 3 turn.
Repeat rows 3 and 4 till you get the width of a pant leg. I used a pair of stretch pants to compare. (19 total rows)

CROTCH:
You should end at the top of the pants (the half double crochets) and do 4 short rows ending where you want the crotch to end (33). Once again I used a pair of knit pants to measure. Still do the front post half double crochets at the top, but don't do the triple crotchets at the bottom. You should end at the top and now you are going to start the second pant leg.


SECOND PANT LEG and BACK OF SECOND PANT LEG:
Row1: Front post half double crochet the first 5 stitches, continue with front post double crochet's (28) till the end of the crotch, then chain till the end of the leg (27). Chain 3 turn.
Row2: triple crochet the next 5 stitches and continue with double crochet's until you get to the laurabangerter.servehttp.com body (22), then do front post double crochets till you get to 6 till the end (27) and do front post half double crochets for the next 6. Chain 2 turn.
Repeat rows 3 and 4 from the front pant leg until you get the same 2 times the same # of rows as the first pant leg.

BOTTOM:
From the top of the pants (the half double crochets) do 6 short rows, but this time make them about an inch and a half longer than the crotch short rows (40).

BACK OF 1st Pant Leg
Do the same thing you did for the second pant leg but only do the # of rows you did for the front pant leg (19)


SEW THE SIDE SEAM:
I did a slip stich down the side of the leg only picking up the front loops, to give it a sort of ribbed effect. It works ok unstretched but stretched it is kind of noticable. If someone has a better idea I'd love to know it. Tie the end and weave the extra yarn in the pants.

SEW THE PANT AND CROTCH SEAMS:
This part is kind of difficult because you have more rows in the back than the front. On the pant legs I used a slip stich picking up only the front loops to give it a ribbed effect. I just tried to gather the crotch parts together evenly. It might help to start at the top and work down one leg and then start at the top and work down the second leg. I'm not sure. I just kind of sewed it together. Sorry I'm not more help.

WAIST BAND:
Make a chain long enough to go around your baby and tie a bow. Then using a yarn needle weave the chain around the waist 5 stiches from the top. I put the bow in back so she would play with it, but in front would work too.

Ta da!!!!

Sorry the pattern isn't more exact, but I'm not a very detailed oriented person…

SUGGESTIONS:
If you don't want the flared legs just ignore the triple crochet stitches and do double instead.

Like I said the resulting longies are very thick. The ribbing is what makes them so thick, so if you only did the front post stitches every other row I think it might work out well. I'm not sure if you should only do them going up, or going down. Doing this you would have to think about where the ribs are in relation to the seams etc. If I make another pair I'm going to try it.


Wednesday, November 22, 2006

Crochet Baby Booties

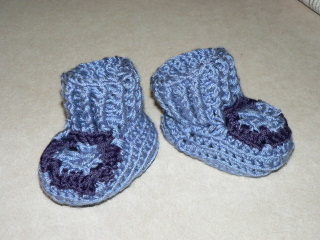
So with my new found crocheting skills and the prospect of making cute little tiny things, I tackled making baby booties. This was actually the second pattern I tried. The first pattern ended up looking more like an elf slipper, which if our little baby girls inherits Floyd's finger toes it might have been fine. But I'm thinking she'll inherit my tiny cinderella feet so she'll need little tiny booties. I tried these out on the 6 month old baby who comes and visits at work and they did fit her.

Here is the crochet baby booty pattern I used and some hints if anyone else wants to try and make these.

I used a size G hook with Micro Spun Lion Brand Yarn, which is really soft and cuddly. Instead of using 3 colors I only used 2. So I used the same blue/periwinkle yarn for the main color (MC) and Color A (CA) and then the purple for Color B (CB).

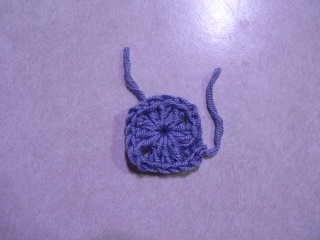
The first thing I learned is that it is key to pay attention whether it says to crochet in the space or in the stitch. When it refers to the "Ch2 space" it means the big empty holes in pictures 1 and 2. At first I crocheted in the stiches and then I ended up with an octogon instead of a square after completing the "Granny Square Instep" section.

The second tip I have is that you should make sure your stitches stay tight. After my first try my stitches were pretty loose and the whole thing was too big.

The following is a progression of the steps. I kind of had a hard time figuring out which way to go after each section, so hopefully this helps someone else.

After 1st part of Granny Step Instep:


The completed Granny Square Instep:


After 1st part of ankle ribbing:


After 2nd part of ankle ribbing:


After ankle ribbing:


Completed booties:

Thursday, November 16, 2006

Sew a Baby Quilt

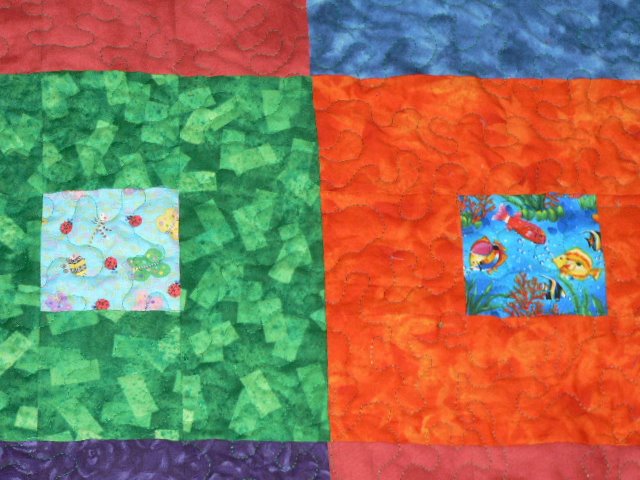
baby quilt


I finally finished the baby quilt I started about 2 years ago. I had started working on it but came across some problems and had messed up in a couple of places so I felt like I couldn't give it to anyone. But when I became pregnant I could finish it and keep it for myself. (Sometimes I feel like I am always passing my bad artwork/crafts to people as gifts, so I feel like I should spare them.) In the end it didn't turn out too bad.


How I made it

Basically each square of the quilt is made from
2 4.5 inch squares of main color
1 4.5 inch square of pattern
2 4.5 inch x 12.5 inch rectangles of main color

When you sew all the pieces together with a .25 inch seam allowance, you end up with a 12.5 inch square. When you sew all of the squares together with a .25 inch seam allowance you end up with 12 inch squares.

I sandwiched the quilt together using a Flynn Quilt Frame and tried to use that for machine sewing as well. I'm not exactly sure what went wrong, but my thread was constantly breaking while trying to quilt this quilt. My theory is that I was using an old spool of thread that wasn't of the best quality. When I replaced the thread it was a little bit better. I also think that the batting I used wasn't of the best quality. I haven't read anywhere that batting can cause thread to break, but it seemed to me like my sewing machine would hit a thick spot and break.

So eventually I got rid of the quilt frame because it was really hard to negotiate it smoothly, plus the thread kept breaking and I would have to take the whole thing apart, unjam the machine, etc, etc. But of course after getting rid of the quilt frame the basting I did to keep the quilt smooth was not very good, and I started getting ripples and folds in the quilt. To make matters worse I quilted about 12 inches on the top the blanket and then the thread kept breaking so I decided to start again from the bottom and maybe things would go more smoothly (which they did). So by the time I get to the middle I have all this extra fabric, due to my bad basting job. Oops. I ended up smoothing all the extra fabric in the middle and folding it straight across. So it kind of looks like there is a seam. Next time I make a quilt I'm going to try to get a batting that is fusible. I didn't even know there was such a thing before, but I think that might be good. Because on all the quilts I make, no matter how careful I try to be I cannot seem to keep the fabric on the bottom from folding and bunching.

When I finally finished quilting, 2 years later, I put Wright's Satin Blanket Binding around it. The instructions on the blanket binding are not very good, and I will make another post on how to fold baby binding because it is kind of tricky to go around a corner and all the instructions just say "fold it around the corner". Anyways my binding ended up being 6 inches too short so I have a spot I patched up at the top. If your binding is too short I think your supposed to sew it together diagnoally to create a longer strip. I didn't do this and so the patch job I did doesn't look very good.

I wasn't sure if the binding was supposed to wrap the extra fabric and batting or not. I ended up serging all the way around to trim the extra fabric and batting (also so I could use my new serger). Then I sewed the binding onto the quilt with only about a quarter of an inch of the blanket sandwiched between the binding. So there is no padding between the layers of satin. I don't know if this was right or not, but that is how I did it. When I managed to coax my sewing machine all the way around the blanket I was finished! Yeah!


baby quilt

baby quilt


Posted by Picasa

Sunday, November 12, 2006

Crochet Baby Hat


Things I'm making for the baby

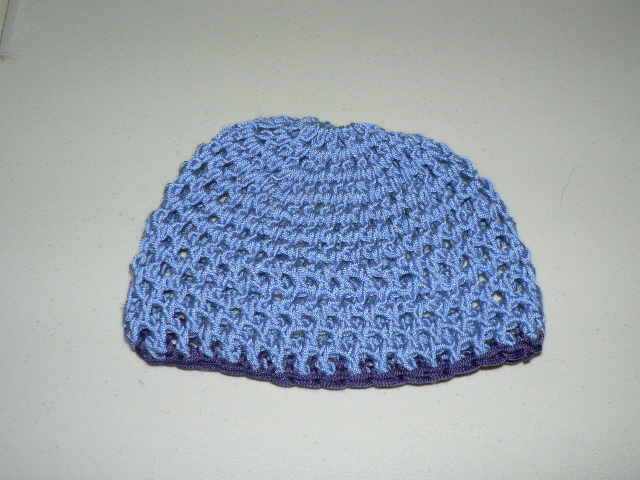
So on my quest to make lots of baby things I crocheted a baby hat. Unfortunately it seems like it might be a little big. I try so hard to do everything according to the directions, but it is really hard to count especially when you are trying to watch TV at the same time. I did start over once after I was about half way done because it was getting really large. Oh well. The pattern I used was at http://www.crochetnmore.com/babybeanie.htm.
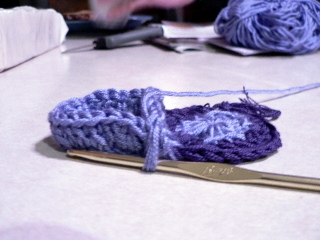
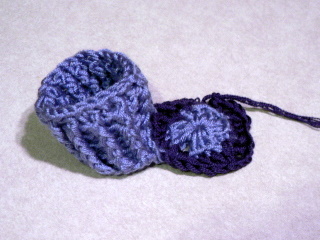
I am not an experienced crochetier (sp?) So when the directions said, Ch4. 11 dc in 4th ch I wasn't sure what that meant. What it really means is chain 4 stiches and then do 11 double crochets in the first stich of the chain, so this becomes the top of the hat and is a little circle on top.

The next problem I had was on the rows 4-12. The following instructions: (Dc bet next 2 sts) . Were kind of confusing and I think this is where my hat grew in size. Your chain three is on top of one stich, so when it says to double crochet between the next 2 stiches it was hard to decide which one is the next stitch. I finally decided it wasn't the stitch directly below you, (ie the space just left to your 3 chained crochets), but the next one. If I make another attempt at the hat I'll try to post a picture. But even though I was trying to be so careful, my hat still grew so that I ended up doing 37 or 38 double crochets instead of the 36 specified. Darn!!

Also I never figured out how to do the reverse single crochet. It probably didn't help that I also tried to change yarn colors at the same time. But by this time my eyes hurt and I just wanted to finish it. So I just single crocheted between the stiches around the hat in the same direction I had been going.

Well if anyone trys to make this baby hat I hope my hints help some, and maybe someday someone can explain the reverse single crochet to me. Are you supposed to keep the needle in the same hand as you always use?

Friday, November 10, 2006

Crochet Wool Diaper Covers


What I am making for the baby

So I am really excited for the baby to come and I think to fulfill my nesting instinct I feel the need to make stuff (this website included). So one of the things I have done is to crochet a Tickle Turdle Wool Diaper Cover. Now I have no idea if these covers are any good, but they only take a few hours to make so it is a good project for me since I don't have a lot of patience.


So I found this website that has videos of crochet stitches. Since basically all I knew how to do was a single crochet, this way I was able to figure out how to do the front post and back post stiches. I had tried looking at some diagrams but those were hopeless. I love the internet. You can learn how to do anything!


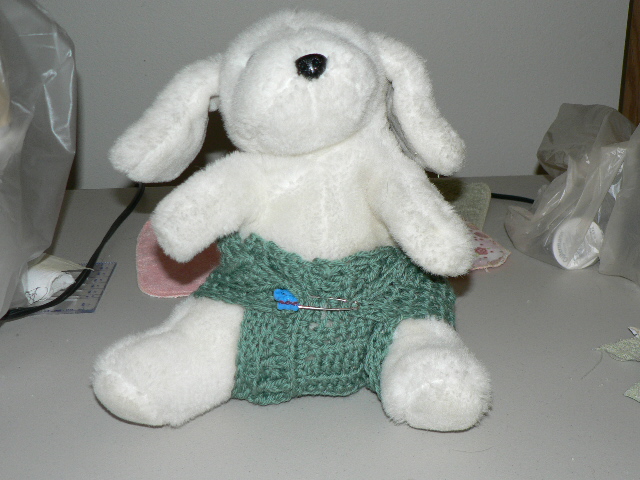
Since I don't have a real baby to try it on I had to put it on a stuffed animal (see picture). So I have made two so far. A size small and an x-small. The x-small may end up being too small, but oh well its really cute. Next I'm going to try crocheting a hat. I still have my quilt I'm working on. But my sewing machine keeps jamming so its kind of frustrating me.